本文最后更新于:2023年4月21日 下午
前言 ast 是什么?它是一种将文本转换为方便程序处理的结构化的数据。可能听到 ast,就会天然的觉得很复杂,但这其实取决于要处理的语言、工具库,如果都有像是 dom 那种封装的非常好的 api,也不会有人抱怨 ast 很复杂了。
下面引用 wiki 的描述
在计算机科学中,抽象语法树( AST ) 或语法树是用形式语言编写的文本(通常是源代码)的抽象语法结构的树表示。树的每个节点表示文本中出现的结构。
语法是 “抽象的”,因为它并不表示出现在真实语法中的每个细节,而只是结构或内容相关的细节。例如,分组括号隐含在树结构中,因此不必将它们表示为单独的节点。同样,像 if-condition-then 语句这样的句法结构可以通过具有三个分支的单个节点来表示。
一些应用的场景
runtime: 运行时,有了 ast 之后就可以执行它,例如 quickjs 之类的嵌入式 js runtime
compiler: 编译器,有了 ast 之后可以将之编译为机器指令,例如 golang/c 之类的语言的编译器
editor: 代码编辑支持,编辑器的提示、报错等等,根据上下文提示可用的变量,例如 lsp 协议
linter: 检查代码,检查代码中是否存在特定结构的代码,例如 eslint/tslint
bundler: 需要找不到不同文件之间的引用关系,也需要处理各种模块,例如 rollup/webpack 之类的
transpiler: 将代码翻译为另一种代码,例如 babel 将 esnext 翻译为 es2015 的代码
generator: 代码生成器,从一些元数据生成代码,例如从 graphql 生成 ts 代码
基本展示 基本上,从应用层面而言,最重要的功能是解析和序列化,即将一段代码解析为 ast 数据结构、以及将 ast 数据结构还原回代码的功能。得到 ast 数据结构之后,我们就可以操纵它了。不管是使用现有的工具函数(例如 document.querySelector 查找节点),还是自行实现一个递归算法,都能够做到查找以及修改的能力。
astexplorer 是一个好工具,它支持主流语言的 ast 可视化展示,包括与前端无关的 Go/Rust/Kotlin/Java 等语言,对了解 ast 结构有很大的帮助。
例如下面这段 js 代码的 ast 的样子
注意,下面的 ast 结构中删除了代码位置的信息,它们通常不太重要,除非涉及到 sourcemap 之类的。
1
2
3
4
5
6
7
8
9
10
11
12
13
14
15
16
17
18
19
20
21
22
23
24
25
26
27
28
29
30
31
32
33
{ "type" : "Program" , "body" : [ { "type" : "VariableDeclaration" , "declarations" : [ { "type" : "VariableDeclarator" , "id" : { "type" : "Identifier" , "name" : "i" } , "init" : { "type" : "BinaryExpression" , "left" : { "type" : "Literal" , "value" : 1 , "raw" : "1" } , "operator" : "+" , "right" : { "type" : "Literal" , "value" : 2 , "raw" : "2" } } } ] , "kind" : "const" } ] , "sourceType" : "module" }
也许你想问,ast 是否有某种形式的规范?或者不同的 ast 之间是否可以统一处理?
1
2
3
4
5
6
7
8
9
10
11
12
13
14
15
16
17
18
19
20
21
parse (`console.log('hello world')` , { lang : 'js' })parse (` package main import "fmt" func main() { fmt.Println("hello world") } ` ,lang : 'go' },parse (` fn main() { println!("Hello World!"); } ` ,lang : 'rust' },
遗憾的是,ast 通常与语言强绑定,这也是为什么解析 go 通常需要使用 go,解析 rust 通常也需要 rust,除非某种语言足够流行,例如 xml/html/json/markdown/js,才会有不同语言的实现,但不同实现之间可能也有一些不同,例如 ts 和 babel 解析 js 代码得到的 ast 就存在巨大差异。
应用场景 下面不会详述解析和序列化是如何完成的,而主要着重于应用场景,因为除非需要创建新的编程语言或 DSL,否则很少需要自己编写解析器,而通常使用现有的,例如 js 代码解析与序列化通常使用 babel。
对实现解析器感兴趣的话可以看 SICP 系列的课程
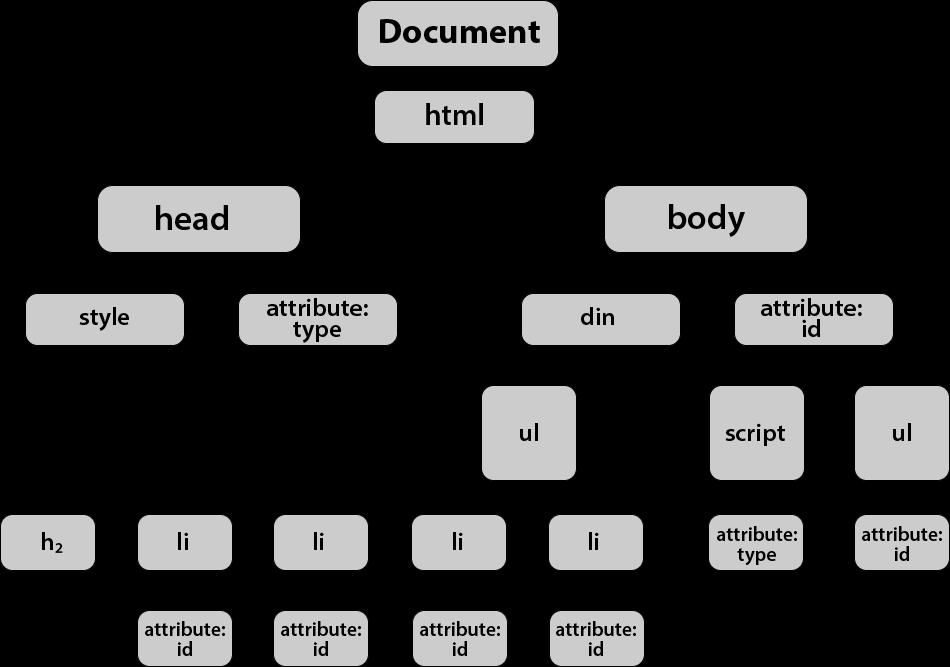
可能是最常用的 ast: dom
对于 web 前端而言,dom 是很熟悉的东西,在现代框架出现之前,不接触它是不可能的。现在通常使用 Document.querySelector 之类的库检索和操作 dom 树,最常见的操作是找到 dom 中的特定节点并做一些修改。
1 2 3 4 5 6 const h1 = document .createElement ('h1' )textContent = 'hello world' document .querySelector ('#app' )!.appendChild (h1)
例如下面这段非常简单 html 的 ast 结构如下
1 <a href ="https://github.com/" > github</a >
解析器: htmlparser2
1
2
3
4
5
6
7
8
9
10
11
{ "type" : "root" , "children" : [ { "type" : "tag" , "children" : [ { "type" : "text" , "data" : "github" } ] , "name" : "a" , "attribs" : { "href" : "https://github.com/" } } ] }
大部分时候可能并不会意识到这点,因为 dom 的 api 发展至今,已经非常好用了,如果用过其他的 xml 解析器,或许就更能感受到这点。不过 web api 也有可以解析 xml/html 文本的 DOMParser/XMLSerializer 接口,在动态渲染一些 html 时仍然有时候会使用到。
1
2
3
4
5
6
7
8
9
10
11
12
const parser = new DOMParser ()const root = parser.parseFromString (`<p> <a href="https://github.com/">github</a> <a href="https://google.com/">google</a> </p>` ,'text/html' ,querySelectorAll ('a' ).forEach ((item ) => {target = '_blank' console .log (root.body .innerHTML )
处理 markdown 中的链接
如果你使用 markdown,或许你有时候也需要自动化处理其中的一些链接转换,例如为特定的 url 添加代理地址。
原始 markdown 内容
1 2 1669384280333.png ](https://lh3.googleusercontent.com/pw/AL9nZEUmvKBtRxGeG-J-0oVDVmdZccu0E0_HiDHaMPlvWBLp1v2wjaA152s9FxkIRFZROAChN-tYgimcK-ZYBFD_KGya40RzSKfDTVJqvoXjg5CsBmAaJPurSPdDmaDm6Bcunj4IxL_YPBnwtH0h7XdwaUxN=w1600-h1200-no )
希望转换得到的 markdown 内容,即为 google 图片的地址添加代理服务,避免无法在 blog 显示的错误。同时也不能转换不相关的链接。
1 2 1669384280333.png ](https://image-proxy.rxliuli.com/?url=https://lh3.googleusercontent.com/pw/AL9nZEUmvKBtRxGeG-J-0oVDVmdZccu0E0_HiDHaMPlvWBLp1v2wjaA152s9FxkIRFZROAChN-tYgimcK-ZYBFD_KGya40RzSKfDTVJqvoXjg5CsBmAaJPurSPdDmaDm6Bcunj4IxL_YPBnwtH0h7XdwaUxN=w1600-h1200-no )
它的 ast 结构如下,可以清楚的看到完成上面的需要只要找到 image 类型的节点然后选择性替换链接即可。
解析器: mdast
1
2
3
4
5
6
7
8
9
10
11
12
13
14
15
16
17
18
19
20
21
22
23
24
25
[ { "type" : "root" , "children" : [ { "type" : "paragraph" , "children" : [ { "type" : "image" , "title" : null , "url" : "resources/aaefd6438fcd48d68f62fc2478f1f857.png" , "alt" : "test" } , { "type" : "text" , "value" : "\n" } , { "type" : "image" , "title" : null , "url" : "https://image-proxy.rxliuli.com/?url=https://lh3.googleusercontent.com/pw/AL9nZEUmvKBtRxGeG-J-0oVDVmdZccu0E0_HiDHaMPlvWBLp1v2wjaA152s9FxkIRFZROAChN-tYgimcK-ZYBFD_KGya40RzSKfDTVJqvoXjg5CsBmAaJPurSPdDmaDm6Bcunj4IxL_YPBnwtH0h7XdwaUxN=w1600-h1200-no" , "alt" : "1669384280333.png" } ] } ] } ]
实际上这件事情很简单,我们只需要过滤出来需要的节点并且修改就好了,下面主要使用 mdast 相关的包(它的上层封装 remark 可能更出名)来解析 markdown。
1
2
3
4
5
6
7
8
9
10
11
12
13
14
15
16
17
18
import { fromMarkdown } from 'mdast-util-from-markdown' import { toMarkdown } from 'mdast-util-to-markdown' import { Image } from 'mdast' import { selectAll } from 'unist-util-select' const s = `   ` .trim ()const root = fromMarkdown (s)selectAll ('image' , root) as Image [])filter ((item ) => url .startsWith ('https://lh3.googleusercontent.com/pw/' ),forEach ((item ) => (item.url = `https://image-proxy.rxliuli.com/?url=${item.url} ` ),console .log (toMarkdown (root))
删除代码中的 console.log
在使用构建工具编译代码时,会使用各种各样的配置和插件,像是有时候会在生产环境中删除 console.log 之类的,其实实现它也不算太难。
1
2
3
4
5
import { add } from './add' console .log ('hello world' )const i = add (1 , 2 )console .log (`count: ${i} ` )
下面使用 acorn 作为解析器、jscodeshift 作为 ast 工具库来实现。
1
2
3
4
5
6
7
8
9
10
11
12
13
14
15
16
17
18
19
20
21
22
23
24
import jscodeshift from 'jscodeshift' const c = `import { add } from './add' console.log('hello world') const i = add(1, 2) console.log(\`count: \${i}\`)` const root = jscodeshift (c)find (jscodeshift.CallExpression , {callee : {type : 'MemberExpression' ,object : {type : 'Identifier' ,name : 'console' ,property : {type : 'Identifier' ,name : 'log' ,remove ()console .log (root.toSource ())
bundler 支持额外类型的文件导入
在实际的代码开发中,我们不仅仅会使用 js,也会使用 ts/image/json/graphql/css/… 等等各类文件,构建工具是如何正确的处理它们的呢?
1
2
3
.app {display : none;
1
2
3
import css from './style.module.css' console .log (css.app )
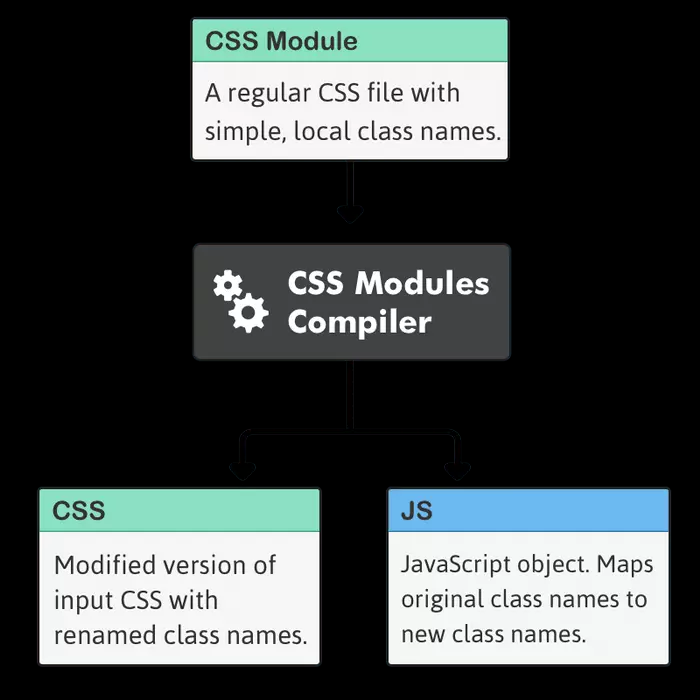
其实这主要归功于构建工具,它解析并找到了 .module.css 后缀名的文件,然后将所有类选择器转换为随机名称,并创建一个 js 对象替换这个导入供 js 使用。例如以上代码会被编译为
1
2
3
._app_1dhlq_7 {display : none;
1
2
3
4
5
6
const app = '_app_1dhlq_7' const css = {app : app,console .log (css)
下面简单实现 css 的转换部分,首先看一下它的 ast
1
2
3
4
5
6
7
8
9
10
11
12
13
14
15
16
17
18
19
20
21
22
23
24
25
26
27
28
29
30
31
{ "type" : "StyleSheet" , "children" : [ { "type" : "Rule" , "prelude" : { "type" : "SelectorList" , "children" : [ { "type" : "Selector" , "children" : [ { "type" : "ClassSelector" , "name" : "app" } ] } ] } , "block" : { "type" : "Block" , "children" : [ { "type" : "Declaration" , "important" : false , "property" : "display" , "value" : { "type" : "Value" , "children" : [ { "type" : "Identifier" , "name" : "none" } ] } } ] } } ] }
基本思路很简单,找到所有的 ClassSelector 然后替换名字并添加映射即可。
1
2
3
4
5
6
7
8
9
10
11
12
13
14
15
16
17
18
19
20
21
22
23
24
25
26
import * as csstree from 'css-tree' import { nanoid } from 'nanoid' function extractClassVars (code : string code : string vars : Record <string , string >const root = csstree.parse (`.app { display: none; }` )const vars : Record <string , string > = {}walk (root, (item ) => {if (item.type !== 'ClassSelector' ) {return if (!vars[item.name ]) {name ] = nanoid ()name = vars[item.name ]return {code : csstree.generate (root),const r = extractClassVars ('.app { display: none; }' )console .log (r)
然后使用 vars 替换掉 import 即可,不过这部分是构建工具相关所以暂且跳过。
实际用例 下面是一些在现有项目中使用到的实际用例
vue3 setup script 语法 – 在 vite-vue-plugin 中通过 @vue/compiler-dom 处理
在编写 graphql 文件时自动生成 ts 文件 – rollup-plugin-graphql-codegen
在构建 web 应用时自动将版本号添加到 dist/index.html 中 – vite-plugin-standard-info
从 som 元数据生成类型以在查询 som 数据时能够正确使用 class/components – som-codegen
从 openapi schema 中生成所有后端服务接口的类型定义 – faas-openapi
为使用的环境变量生成类型定义 ImportMeta – vite-plugin-env-dts-gen
加载应用的 webApp.js 时自动将 ipc-main bundle 进去 – esbuild-wasm
现有的解析器
astexplorer 中可以看常用语言的解析器,可以选择适合自己的
一些工具包
名字
说明
jscodeshift
类似于 jq 的上层封装,基于 ast-types
ast-types
通用的 js/ts ast 抽象,但实现在某些细微之处有问题
结语 操纵 ast 可以完成很多有趣的事情,包括但不限于代码生成、修改和运行,它们虽然在一般的业务开发中少有涉猎,但更下层的许多基础设施非常依赖它,也是是前端工程化中绕不过去的部分。


