代码生成-从 module css 生成 dts

本文最后更新于:2022年10月18日 上午

前言

代码生成对于很多开发者都不是陌生的概念,从使用脚手架(create-react-app)生成项目,到使用 ide 生成代码、或是从后端 api schema 生成代码,几乎不可能避免使用它。它可以解决各种各样的问题

  • 从同一个来源生成项目,避免千人千面的项目整体结构
  • 减少编写样板代码
  • 避免在多个地方重复编写代码导致的不一致性

但在使用 TypeScript 时,它还可以做到一些其他有趣的事情,包括

  • 生成类型提高开发者体验,例如为 env、module css、i18n config 生成类型定义
  • 支持原本不支持引入的文件,例如为 graphql 生成代码音变引入它

或许有人会认为代码生成需要处理 ast(即抽象语法树),而处理 ast 是一件复杂的事情,因而不去尝试做类似的事情。吾辈要说的是,ast 的实际结构确实可能会很复杂,例如 TypeScript 官方解析器解析 ts 得到的那个,但其核心却相当简单,这个领域仅仅只是门槛稍微有点高。如果你选择了一个合适的语法树操作工具,再加上现有的各种 代码 <=> ast 可视化工具,那事情会变得简单许多。

基本

想要生成代码,基本上就像将一只大象放进冰箱里面一样需要三步

  1. 得到某种类型的元数据,例如从 css 得到它的 ast
  2. 转换元数据得到生成目标代码的 ast
  3. 将 ast 转换成代码

代码生成步骤.drawio.svg

正如标题所言,在这里主要的目标代码是 TypeScript,相应的,元数据的来源多种多样,从 json 数据、到其他语言的 ast、到远端的接口,这实际上没有什么限制,只要你能够将之转换为目标 ast 即可。

下面我们将来尝试第一个,也是最简单的一个,从 module css 文件生成类型定义

从 css 生成类型定义

动机

为什么要这样做?

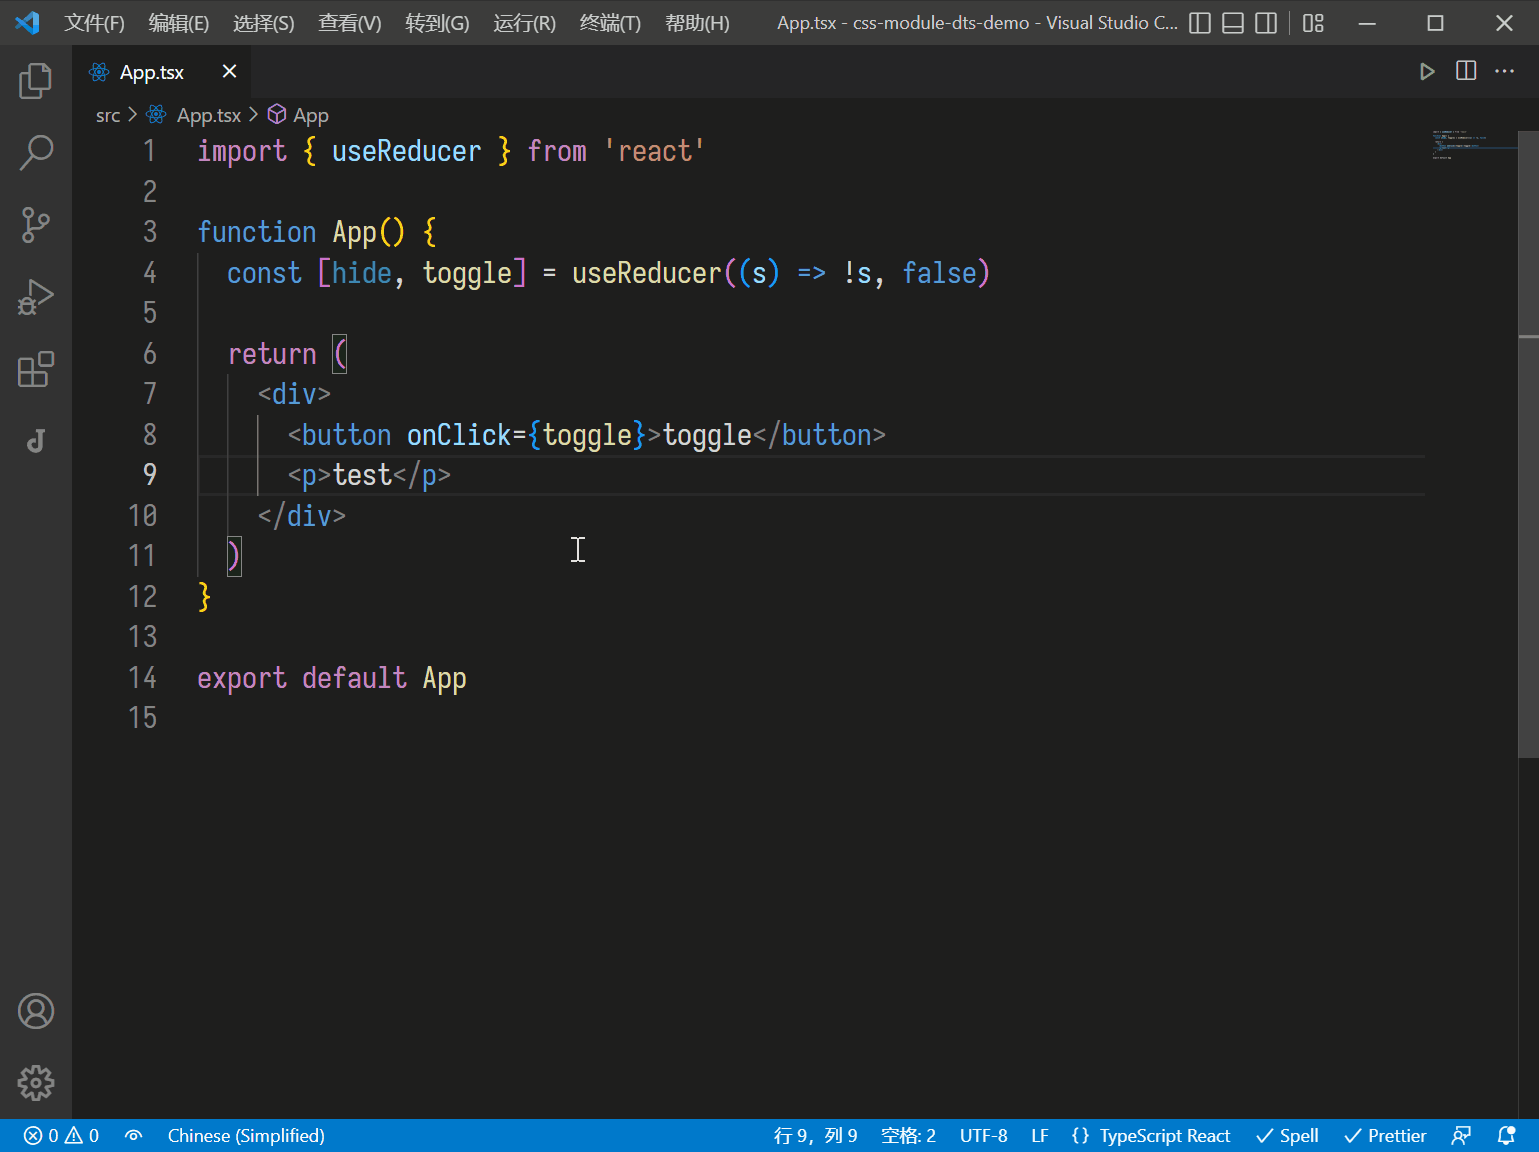
在使用 css module 时,我们通常使用构建工具,例如 rollup/vite/webpack 来解析 *.module.css 文件,并使得最终 bundle 中的结果符合预期。但在开发阶段,它并没有太多提示,例如定义了一个 css class,但你在 ts 中使用时,并不会有什么提示。当你将一个 css class 删除后,也不会有任何代码提示。
例如下面这个示例

1
2
3
4
/* App.module.css */
.hide {
display: none;
}
1
2
3
4
5
6
7
8
9
10
11
12
13
// App.tsx
import { useReducer } from 'react'
import css from './App.module.css'

export function App() {
const [hide, toggle] = useReducer((s) => !s, false)
return (
<div>
<button onClick={toggle}>toggle</button>
<p className={hide ? css.hide : ''}>test</p>
</div>
)
}

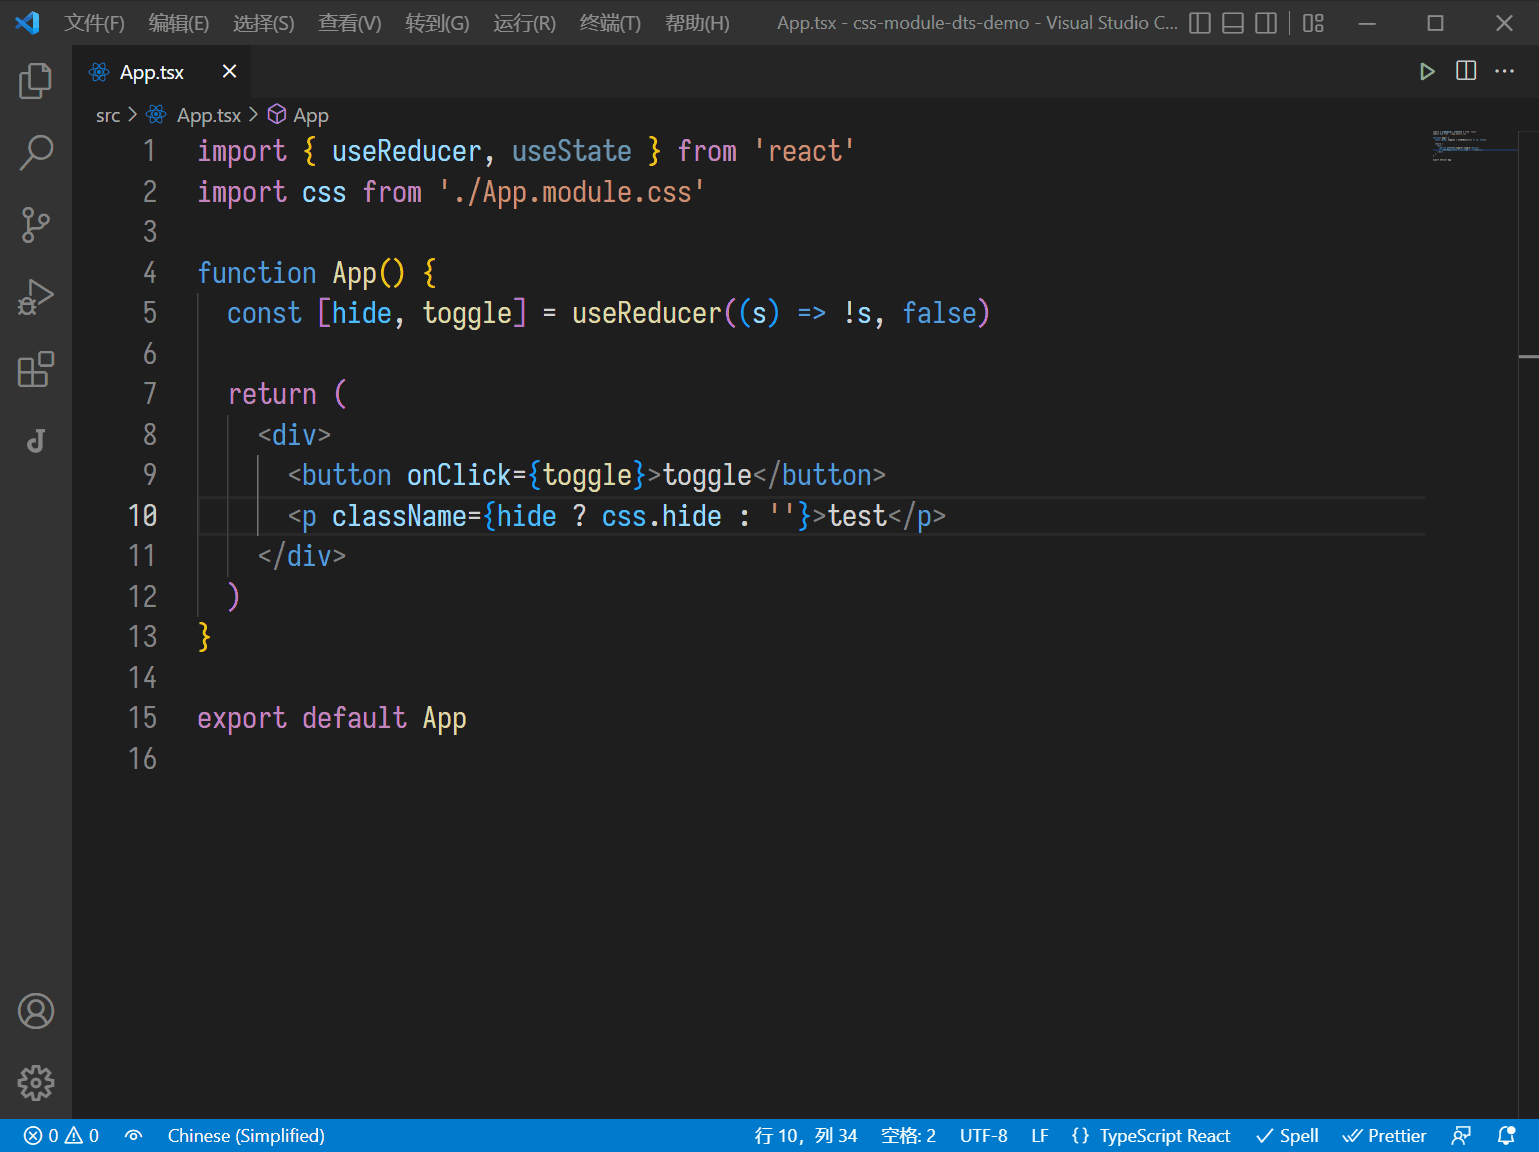
如果我们在 App.module.css 旁边放一个 App.module.css.d.ts 文件,那么在 ts 中使用时就会很快乐

1
2
3
4
5
const css: {
hide: string
}

export default css

当然,在 ide 中也可以完成这个功能,但每个 ide 都需要实现一遍这个功能,这正是问题所在,插件无法跨 ide 使用,但基于 TypeScript 的代码提示可以做到跨 ide 使用,包括 vscode、jetbrains ide、vim 等等。

技术选型

正如上面所言,想要生成代码,在这里需要得到 css ast 和转换 css ast 为 ts ast,而这就需要选择一个合适的解析器来解析 css 得到 ast 以及生成 ts ast 并转换为代码了。

从 css 生成接口基本流程.drawio.svg

我们使用以下两个库

  • css-tree: 解析 css 代码为 cssom
  • ast-types: 一个通用的 ts/js ast 高层次抽象
  • recast: 基于 ast-types 的一个 ast 解析生成器

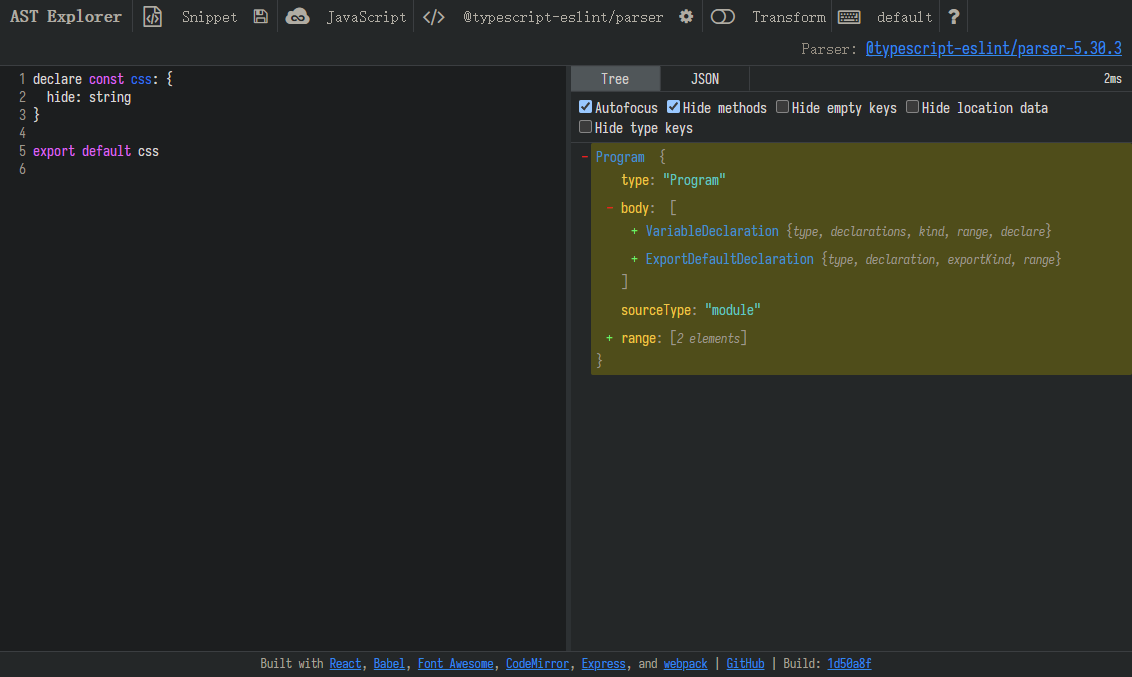
Tip: 代码的 ast 可以在 https://astexplorer.net/ 以可视化的方式检查
1664382002113.png

解析 css

首先,解析 css 得到 ast,并从中过滤出所有 class 选择器类名

1
2
3
4
5
6
7
8
9
10
function parse(code: string): string[] {
const ast = csstree.parse(code)
const r: string[] = []
csstree.walk(ast, (node) => {
if (node.type === 'ClassSelector') {
r.push(node.name)
}
})
return r
}

然后将 css 类名列表转换为 ast

1
2
3
4
5
6
7
8
9
10
11
12
13
14
15
16
17
18
19
20
21
22
function convert(classes: string[]): n.Program {
return b.program([
b.variableDeclaration('const', [
b.variableDeclarator(
b.identifier.from({
name: 'css',
typeAnnotation: b.tsTypeAnnotation(
b.tsTypeLiteral(
classes.map((s) =>
b.tsPropertySignature(
b.identifier(s),
b.tsTypeAnnotation(b.tsStringKeyword()),
),
),
),
),
}),
),
]),
b.exportDefaultDeclaration(b.identifier('css')),
])
}

最后,将 ast 转换为 ts 代码

1
2
3
function format(ast: n.ASTNode): string {
return prettyPrint(ast).code
}

结合一下 3 个方法

1
2
3
4
5
export function generate(cssCode: string): string {
const classes = parse(cssCode)
const ast = convert(classes)
return format(ast)
}

做个最简单的测试

1
2
3
4
5
6
7
8
9
10
11
12
13
console.log(
generate(`/* App.module.css */
.hide {
display: none;
}
`),
)
// 会得到以下代码
// const css: {
// hide: string
// };

// export default css;

看起来我们完成了基本的从 css 到 dts 的代码生成,但如果希望实用,它还需要一些额外的步骤

  1. 更好的使用方式封装,例如封装为 cli 自动扫描指定目录下的所有 *.module.css 文件并生成对应的 dts 文件,或者是通过插件直接集成到开发工具的流程中,例如 vite 插件
  2. 发布为 npm 包,或者使用某种形式的 monorepo 便于在多个项目复用

下面使用 vite 插件作为演示

1
2
3
4
5
6
7
8
9
10
11
12
13
14
15
16
17
18
19
20
21
22
23
24
25
26
27
28
29
30
31
32
33
34
35
36
37
38
39
40
41
42
43
44
45
46
47
48
49
50
51
52
53
54
55
56
57
import { defineConfig, Plugin, ResolvedConfig } from 'vite'
import react from '@vitejs/plugin-react'
import { globby } from 'globby'
import path from 'path'
import * as csstree from 'css-tree'
import { namedTypes as n, builders as b } from 'ast-types'
import { prettyPrint } from 'recast'
import fsExtra from 'fs-extra'
import { watch } from 'chokidar'

// 上面的代码。。。

const { pathExists, readFile, remove, writeFile } = fsExtra

function cssdts(): Plugin {
let config: ResolvedConfig
async function generateByPath(item: string) {
const cssPath = path.resolve(config.root, item)
const code = await readFile(cssPath, 'utf-8')
await writeFile(cssPath + '.d.ts', generate(code))
}

return {
name: 'vite-plugin-cssdts',
configResolved(_config) {
config = _config
},
async buildStart() {
const list = await globby('src/**/*.module.css', {
cwd: config.root,
})
await Promise.all(
list.map(async (item) => {
const cssPath = path.resolve(config.root, item)
await generateByPath(cssPath)
}),
)
},
configureServer(server) {
watch('src/**/*.module.css', { cwd: config.root })
.on('add', generateByPath)
.on('change', generateByPath)
.on('unlink', async (cssPath) => {
if (cssPath.endsWith('.module.css')) {
const dtsPath = cssPath + '.d.ts'
if (await pathExists(dtsPath)) {
await remove(dtsPath)
}
}
})
},
}
}

export default defineConfig({
plugins: [react(), cssdts()],
})

现在,每当启动 vite 时都会自动扫描所有的 *.module.css 生成对应的类型定义,在开发模式下还会持续监听文件的变化。

代码提示.gif

sourcemap

目前已经实现了代码提示和校验的功能,但跳转尚未生效,我们可以使用 source-map 来实现它。这是另一个有趣的技术,在之后将详细介绍,这里仅说明一下工作方式。sourcemap 将一个文件的内容与一或多个源文件的内容映射,chrome 或 vscode 均支持根据 sourcemap 自动查找对应的源文件,利用这个功能我们可以让生成的 dts 指向 css 文件。

效果

跳转.gif

完整代码

1
2
3
4
5
6
7
8
9
10
11
12
13
14
15
16
17
18
19
20
21
22
23
24
25
26
27
28
29
30
31
32
33
34
35
36
37
38
39
40
41
42
43
44
45
46
47
48
49
50
51
52
53
54
55
56
57
58
59
60
61
62
63
64
65
66
67
68
69
70
71
72
73
74
75
76
77
78
79
80
81
82
83
84
85
86
87
88
89
90
91
92
93
94
95
96
97
98
99
100
101
102
103
104
105
106
107
108
109
110
111
112
113
114
115
116
117
118
119
120
121
122
123
124
125
126
127
128
129
130
131
132
133
134
135
136
137
138
139
140
141
142
143
144
145
146
147
148
149
150
151
152
153
154
155
156
157
158
159
160
161
162
163
import { SourceMapGenerator, SourceNode } from 'source-map'
import { defineConfig, Plugin, ResolvedConfig } from 'vite'
import react from '@vitejs/plugin-react'
import { globby } from 'globby'
import path from 'path'
import * as csstree from 'css-tree'
import { namedTypes as n, builders as b } from 'ast-types'
import * as recast from 'recast'
import fsExtra from 'fs-extra'
import { watch } from 'chokidar'
import { keyBy } from 'lodash-es'
import tsParser from 'recast/parsers/typescript.js'

function parse(code: string): csstree.ClassSelector[] {
const ast = csstree.parse(code, { positions: true })
const r: csstree.ClassSelector[] = []
csstree.walk(ast, (node) => {
if (node.type === 'ClassSelector') {
r.push(node)
}
})
return r
}

function convert(classes: csstree.ClassSelector[]): n.Program {
const r = b.variableDeclaration('const', [
b.variableDeclarator(
b.identifier.from({
name: 'css',
typeAnnotation: b.tsTypeAnnotation(
b.tsTypeLiteral(
classes.map((s) =>
b.tsPropertySignature(
b.identifier(s.name),
b.tsTypeAnnotation(b.tsStringKeyword()),
),
),
),
),
}),
),
])
;(r as unknown as n.TSTypeAliasDeclaration).declare = true
return b.program([r, b.exportDefaultDeclaration(b.identifier('css'))])
}

function format(ast: n.ASTNode): string {
return recast.prettyPrint(ast).code
}

function sourcemap({
code,
classes,
source,
target,
}: {
code: string
classes: csstree.ClassSelector[]
source: string
target: string
}) {
const root = recast.parse(code, { parser: tsParser })
const cssSelectorsMap = keyBy(classes, (item) => item.name)
const map = new SourceMapGenerator({
file: target,
})
recast.visit(root, {
visitTSPropertySignature(path) {
const name = (path.node.key as n.Identifier).name
console.log((path.node.key as n.Identifier).name)
const css = cssSelectorsMap[name]
interface Pos {
line: number
column: number
}

function add(original: Pos, generated: Pos) {
map.addMapping({
source: source,
original: {
line: original.line,
column: original.column,
},
generated: {
line: generated.line,
column: generated.column,
},
})
}
add(css.loc!.start, path.node!.key.loc!.start)
add(css.loc!.end, path.node!.key.loc!.end)
return false
},
})
return map.toString()
}

export function generate(
cssCode: string,
source: string,
target: string,
): string {
const classes = parse(cssCode)
const ast = convert(classes)
const code = format(ast)
const mapCode = sourcemap({ code, classes, source, target })
return (
code +
'\n//# sourceMappingURL=data:application/json;charset=utf-8;base64,' +
btoa(mapCode)
)
}

const { pathExists, readFile, remove, writeFile } = fsExtra

function cssdts(): Plugin {
let config: ResolvedConfig
async function generateByPath(item: string) {
const cssPath = path.resolve(config.root, item)
const code = await readFile(cssPath, 'utf-8')
const dtsPath = cssPath + '.d.ts'
await writeFile(dtsPath, generate(code, cssPath, dtsPath))
}

return {
name: 'vite-plugin-cssdts',
configResolved(_config) {
config = _config
},
async buildStart() {
const list = await globby('src/**/*.module.css', {
cwd: config.root,
})
await Promise.all(
list.map(async (item) => {
const cssPath = path.resolve(config.root, item)
await generateByPath(cssPath)
}),
)
},
configureServer(server) {
watch('src/**/*.module.css', { cwd: config.root })
.on('add', generateByPath)
.on('change', generateByPath)
.on('unlink', async (cssPath) => {
if (cssPath.endsWith('.module.css')) {
const dtsPath = cssPath + '.d.ts'
if (await pathExists(dtsPath)) {
await remove(dtsPath)
}
}
})
},
}
}

export default defineConfig({
plugins: [react(), cssdts()],
build: {
sourcemap: 'inline',
minify: false,
},
})

结语

在之后的几篇文章中,吾辈将演示代码生成的实际用途,并实现一些简单的例子,也会给出现有的更完善的的工具(如果有的话)。


代码生成-从 module css 生成 dts
https://blog.rxliuli.com/p/b8e8ce8bccff49d191480a40a18a7fc8/
作者
rxliuli
发布于
2022年9月28日
许可协议